
|
8 String Falcate Braced Nylon String Crossover Blog:
May 22th 2018
I started (and restarted) the neck for this guitar. building a bolt on bolt off classical guitar in the Gore style uses a 4 mm wedge under the fretboard. Classical guitars often have the neck pitched forward a couple of mm to deal with the fact that relative to a steel string the classical has a lower string height off of the top and a higher action at the 12th fret. Where steel strings necks are tilted back a bit to get the required height of the strings as stated above classical guitars need the opposite angle. There are a variety of ways that classical builder sets up this geometry. The simplest is no neck angle and sloping the fret board such that the fretboard at the nut is taller than at the sound board end. This is a noticeable feature when looking at the guitar. A classical built in the traditional spanish style can build the forward angle into their work board with the angle locked into place when the back is glued on. Others build the angle into an elevated neck.
The Gore style bolt on bolt off neck needs the neck to be in plane with the upper bout of the guitar, so that neck can not be pitched forward. The correct geometry can be achieved with a sloped fretboard, but for aesthetic reasons Gore does the opposite and uses a wedge made from the neck material to create the angle. The wedge ends up as part of the fretboard assembly before it is installed on the guitar. When done correctly it is very hard to find the glue joint so the wedge is not seen.
This does create a few issues that need to be dealt width. Of course the wedge becomes part of the necks thickness. The truss rod if installed still needs to be close to the fret board so it needs to be both in the wedge and the neck. The hardest issue is to blend the 4 mm higher nut into the transition into the headstock. Gore does this by pushing the fretboard away from the transition between the neck and head stock and with the wedge extended past the nut end of the fretboard. That extension can be planed into the headstock. It is hard to describe but here is a figure that may or may not help. As I build the neck you will see as well.
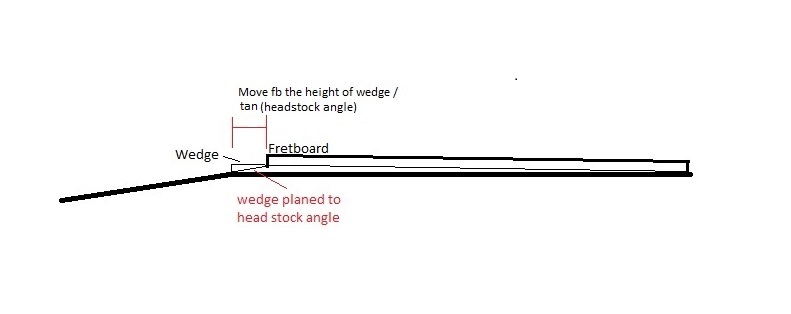 To apply this to this crossover I had to work through the original setup parameters to properly lay out the neck. The parameters that set the geometry are as follows. The desired string height over the top at the saddle position (10 - 11 mm), The height off of the top at the saddle position projecting the neck plane (3 mm), desired action at the 12th fret (2.5 mm), thickness of the fretboard (6 mm) and the height of the fret 1 mm. I also throw in a -1 mm fudge factor for guitar movement under tension. So 11 mm = 3 mm + (2.5 mm * 2) + 6 mm + 1 mm - 1 mm - (height of wedge at nut). So the height of my wedge needs to be 3 mm. when laying out the neck blank the fretboard and all related measurements need to be pushed back from the neck\head stock position by 3 mm/(tan(15) = 11.2 mm.
So with all of this information I happily made a neck blank for a 660 mm scale 12 fret neck join. :(
.jpg) With all of that experience I am making the proper 14 fret join neck
With all of that experience I am making the proper 14 fret join neck
.jpg)
.jpg)
.jpg)
.jpg)
.jpg)
.jpg) I have started to work through a headstock shape as well.
I have started to work through a headstock shape as well.
.jpg)
May 24th 2018
There are a few steps involved to make a Gore style bolt on bolt off neck for contemporary nylon string guitar before I can start to shape it: The mortice and the tenon need to be made, the neck has to be fitted to the body with the correct neck angle, the bolt on brass inserts installed, truss rod slot on both the neck and a matching slot on the wedge for the fretboard and finally, at least for this post, the neck extension and the pocket for it need to be made.
First off I glued onto the neck a block of wood to make the neck heel
.jpg) While starting this neck I threw on a 1/3 3 tpi blade onto my bandsaw to get a clean cut for resawing a neck blank including resawing the 4 mm plate of mahogany I need for the neck wedge. With this blade installed it occured to me that it would be a lot easier to make a couple of cuts for the neck tenon on the band saw than using my tenoning jig my table saw. The 1/2" blade just makes it easier to get a clean cut.
While starting this neck I threw on a 1/3 3 tpi blade onto my bandsaw to get a clean cut for resawing a neck blank including resawing the 4 mm plate of mahogany I need for the neck wedge. With this blade installed it occured to me that it would be a lot easier to make a couple of cuts for the neck tenon on the band saw than using my tenoning jig my table saw. The 1/2" blade just makes it easier to get a clean cut.
.jpg)
.jpg) I did go to the table saw to cut the heel cheeks as it is a lot easier to setup the compound angle I want. I want the cheeks to have a 88.5° angle to the face of the neck which will tilt the neck back 1.5° also I want the cheeks cut at about a 5° angle to provide relief for the curve of the rims on the top. I used a miter gauge for the 1.5° and tilted the blade for the 5° angle.
I did go to the table saw to cut the heel cheeks as it is a lot easier to setup the compound angle I want. I want the cheeks to have a 88.5° angle to the face of the neck which will tilt the neck back 1.5° also I want the cheeks cut at about a 5° angle to provide relief for the curve of the rims on the top. I used a miter gauge for the 1.5° and tilted the blade for the 5° angle.
.jpg)
.jpg) I use the [url=http://www.luthiertool.com/edge_vise.html]Luthier Tool Company[/url] end vice to route out the mortice on the body. It is pretty tight, you align to the center line, remove the centerline insert, replace with the mortice template and rout to depth.
I use the [url=http://www.luthiertool.com/edge_vise.html]Luthier Tool Company[/url] end vice to route out the mortice on the body. It is pretty tight, you align to the center line, remove the centerline insert, replace with the mortice template and rout to depth.
.jpg)
.jpg)
.jpg)
.jpg) Even though the angle is roughed in, it is critical to get the neck angle adjusted nearly perfectly before moving on. The neck angle is fixed when the body pocket is routed for the bolt on\off feature.
Even though the angle is roughed in, it is critical to get the neck angle adjusted nearly perfectly before moving on. The neck angle is fixed when the body pocket is routed for the bolt on\off feature.
I use either an rabbet plane or chisels to adjust the heel cheeks. I can not stand straight surfaces. It is possible to use sandpaper and floss but I get board and use an edge tool. You need to take some care so that you do not blow out the edge of the face of the neck. I always try to plane from the face in. Use the chisel or plane from each end and take a cut in the center to level. You can also take a chiel and relieve the edge before making the cut with the plane.
.jpg)
.jpg) First I center and then I adjust the angle.
First I center and then I adjust the angle.
.jpg)
.jpg) Not mentioned above, the with of the neck at the heel needs to be within finish sanding of final or the above adjustments are for naught. For this guitar the neck blank started at the correct width.
Not mentioned above, the with of the neck at the heel needs to be within finish sanding of final or the above adjustments are for naught. For this guitar the neck blank started at the correct width.
.jpg) I used a belt sander to sand the bottom of the tenon so that it was in plane with the heel cheeks to assure that the brass inserts will not be tilted relative to the heel block.
I use my drill press to get straight holes for the inserts.
I used a belt sander to sand the bottom of the tenon so that it was in plane with the heel cheeks to assure that the brass inserts will not be tilted relative to the heel block.
I use my drill press to get straight holes for the inserts.
.jpg) Hole centers to transfer the hole pattern to the body
Hole centers to transfer the hole pattern to the body
.jpg)
.jpg) When installing the inserts I support the tenon to keep from blowing it out.
When installing the inserts I support the tenon to keep from blowing it out.
.jpg) I double checked the angles with the bolts on and made minor adjustments. I also checked the neck angle using the fret board propped up 4 mm on the nut side to simulate the wedge. I ended up at 8 mm which should work as I will have 2.5 mm action at the 12th fret so 8mm + 4 will put me at 12 mm. A mm higher than my target but the fretboard still needs to sanded .5 mm. Before gluing on the fretboard I will lock in the correct geometry.
I double checked the angles with the bolts on and made minor adjustments. I also checked the neck angle using the fret board propped up 4 mm on the nut side to simulate the wedge. I ended up at 8 mm which should work as I will have 2.5 mm action at the 12th fret so 8mm + 4 will put me at 12 mm. A mm higher than my target but the fretboard still needs to sanded .5 mm. Before gluing on the fretboard I will lock in the correct geometry.
.jpg)
.jpg)
.jpg) The wedge really becomes part of the neck between the neck and the fretboard. I want the truss rod right under the fretboard so I had to slope the neck 4 mm while routing the truss rod. I also routed the blank that I will make the wedge. The normal procedure would be to glue on the 4 mm thick mahogany onto the fretboard and then before making the wedge routing for the truss rod. Thinking it would be easier to make the wedge off of the radiused fretboard. I routed the wedge blank first, made the wedge and then glued it on. I am not sure if I will do this again as the glue up was hard with a very fragile wedge that needs to stay perfectly centered while gluing.
The wedge really becomes part of the neck between the neck and the fretboard. I want the truss rod right under the fretboard so I had to slope the neck 4 mm while routing the truss rod. I also routed the blank that I will make the wedge. The normal procedure would be to glue on the 4 mm thick mahogany onto the fretboard and then before making the wedge routing for the truss rod. Thinking it would be easier to make the wedge off of the radiused fretboard. I routed the wedge blank first, made the wedge and then glued it on. I am not sure if I will do this again as the glue up was hard with a very fragile wedge that needs to stay perfectly centered while gluing.
.jpg)
.jpg)
.jpg) making the wedge; if I keep the blade forward of the 4 mm edge by the time I get close to 0mm on the other end I have the right size wedge.
making the wedge; if I keep the blade forward of the 4 mm edge by the time I get close to 0mm on the other end I have the right size wedge.
.jpg)
.jpg) It was a pain gluing on but ultimately it turned out.
For a clean look I planed the nut slot right into the fretboard. The zero slot was cut so it was easy to remove a lot of it with chisel and I cleaned with my baby plane.
It was a pain gluing on but ultimately it turned out.
For a clean look I planed the nut slot right into the fretboard. The zero slot was cut so it was easy to remove a lot of it with chisel and I cleaned with my baby plane.
.jpg)
.jpg) I filled in the end where the truss rod slot does not need to be. I should have stopped when routing it.
I filled in the end where the truss rod slot does not need to be. I should have stopped when routing it.
.jpg) Also note that the wedge extends past the nut location on the neck. Once I glue the wedge and the fretboard assembly to the neck I will plane or chisel the excess of the wedge to match the headstock angle. You can get an idea from the picture. This detail makes the wedge work.
Also note that the wedge extends past the nut location on the neck. Once I glue the wedge and the fretboard assembly to the neck I will plane or chisel the excess of the wedge to match the headstock angle. You can get an idea from the picture. This detail makes the wedge work.
.jpg) Lastly for now was to fabricate the neck extension and route the pocket for it in the neck and body,
Lastly for now was to fabricate the neck extension and route the pocket for it in the neck and body,
.jpg)
.jpg)
.jpg)
.jpg) With the neck still in the body I glued the extension to the neck. While clamped into the neck I pulled the neck from the body to avoid gluing the extension to the body.
With the neck still in the body I glued the extension to the neck. While clamped into the neck I pulled the neck from the body to avoid gluing the extension to the body.
.jpg) I planed the extension to be in plane with the neck and finally done for the day
I planed the extension to be in plane with the neck and finally done for the day
.jpg)
.jpg)
Next
|
|

|
|
|